


JPEG, the go-to image format we all know, is everywhere—from your social media pics and email attachments to those fancy photography shots and blog pics. It's popular because it squeezes files nicely for the web, plays well with all your gadgets and apps, and generally keeps things small. But, even though JPEGs are compressed, they can still give you a headache with slow websites and hogging storage space.
This guide spills the beans on how to shrink JPEGs without trashing their quality, so your pics stay sharp and your files stay lean.
What Is a JPEG Image File?
In the 1980s, the Joint Photographic Experts Group (JPEG) established a standardised file format for digital photographs, which has since become the predominant choice, surpassing all other image formats in popularity.
JPEG is a common choice for website use, with 77.8% of sites employing this format. For smaller tasks, such as email attachments, handling large photos, and archival purposes, JPEG is also often the most optimal choice.
Thanks to lossy compression and 24-bit colours, JPEG enables image compression ratios ranging from 10:1 to 20:1. JPEG images are identified by file extensions such as .jpg, .jpeg, .jpe, .jif, .jfif, and .jfi. Yes, all these were developed by JPEG.
What’s the Difference Between JPEG & JPG
The terms "JPEG" and "JPG" refer to the same image file format, and the difference is primarily in the file extension.
-
JPEG (Joint Photographic Experts Group): This is the full and original acronym for the image compression format. The term "JPEG" is commonly used and recognized.
-
JPG: This is a shortened version of "JPEG" and represents the same image file format. The use of ".jpg" as a file extension is a common practice, especially in the context of file naming for images.
How Does JPEG Compression Work?
JPEG compression, as the name suggests, involves reducing the file size of a JPEG image to an acceptable level. This process condenses all the intricate details into a smaller, easily shareable file without compromising quality. The benefits of JPEG compression include improved transmission speed, faster online viewing access, and significant savings in disk space, making it ideal for quick uploads and downloads.
JPEG compression can be broadly classified into two types:
-
JPEG Lossless Compression:
-
This algorithm resizes an image into a smaller version while preserving its quality.
-
No part of the image is eliminated during the process, and it is reversible.
-
However, the converted image may still be too large for optimal display on a webpage.
-
JPEG Lossy Compression:
-
In this resizing algorithm, some parts or non-essential tags are permanently eliminated from the original image.
-
The result is a significantly smaller image with minimal impact on quality.
-
This method is well-suited for faster load times, especially for online use, but some colour data may be irreversibly lost.
Why You Might Need to Compress a JPEG Image
Nearly every website relies on JPEG images on a daily basis, and the file size of these images significantly influences their performance. Larger file sizes often lead to slower page loading times, which is a critical factor for ensuring a positive user experience.
Moreover, Google's ranking algorithm places significant importance on the speed of page loading. Consequently, for your website to rank on the first page of search results, it’s necessary that it loads quickly. Beyond the UX issues and search engine optimisation (SEO), the impact of large file sizes extends to your website's cloud storage usage. Therefore, it’s often not just advisable but necessary to compress and reduce the file size of JPEG images.
How? With these tools.
Best Tools to Compress a JPEG Image
How to Optimise a JPEG Image with 4K Image Compressor
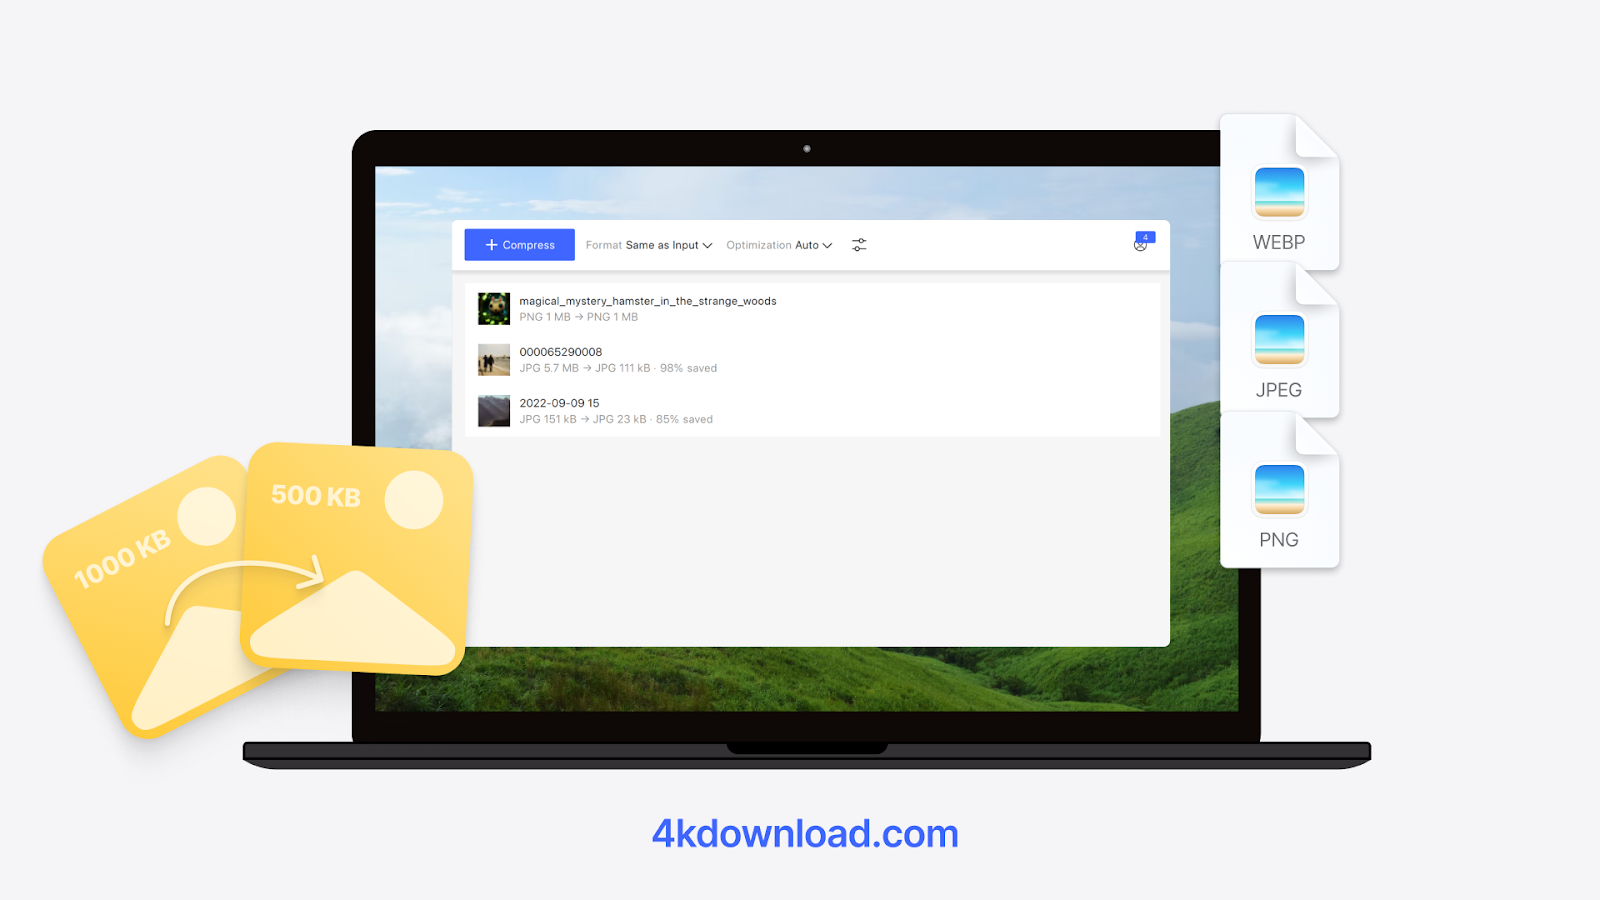
4K Image Compressor is a desktop app compatible with Windows, macOS, and Linux computers. Apart from JPEG, it can optimise images in various formats, including WEBP, HEIC, and PNG, but more formats will be available soon.
If you want to reduce the size of your JPEG files, you can easily do it with 4K Image Compressor. Here’s how:
1. Launch 4K Image Compressor.
2. Select the output format and value in the settings bar.
3. If you selected the Percent value, enter the number of percents you want to compress the file by. If you selected the Size value, enter the number and unit (B, KB, MB).
4. Click the Compress button located in the middle of the application window.
5. In the opened window, select the image for compression and click Open.
Your JPEG will be immediately uploaded and compressed.
Hover the cursor over the compressed image preview and click the folder icon to find the file on your computer.
Tip: You can also choose the compression presets if you choose the auto compression.
How to Compress a JPEG Image with CapCut
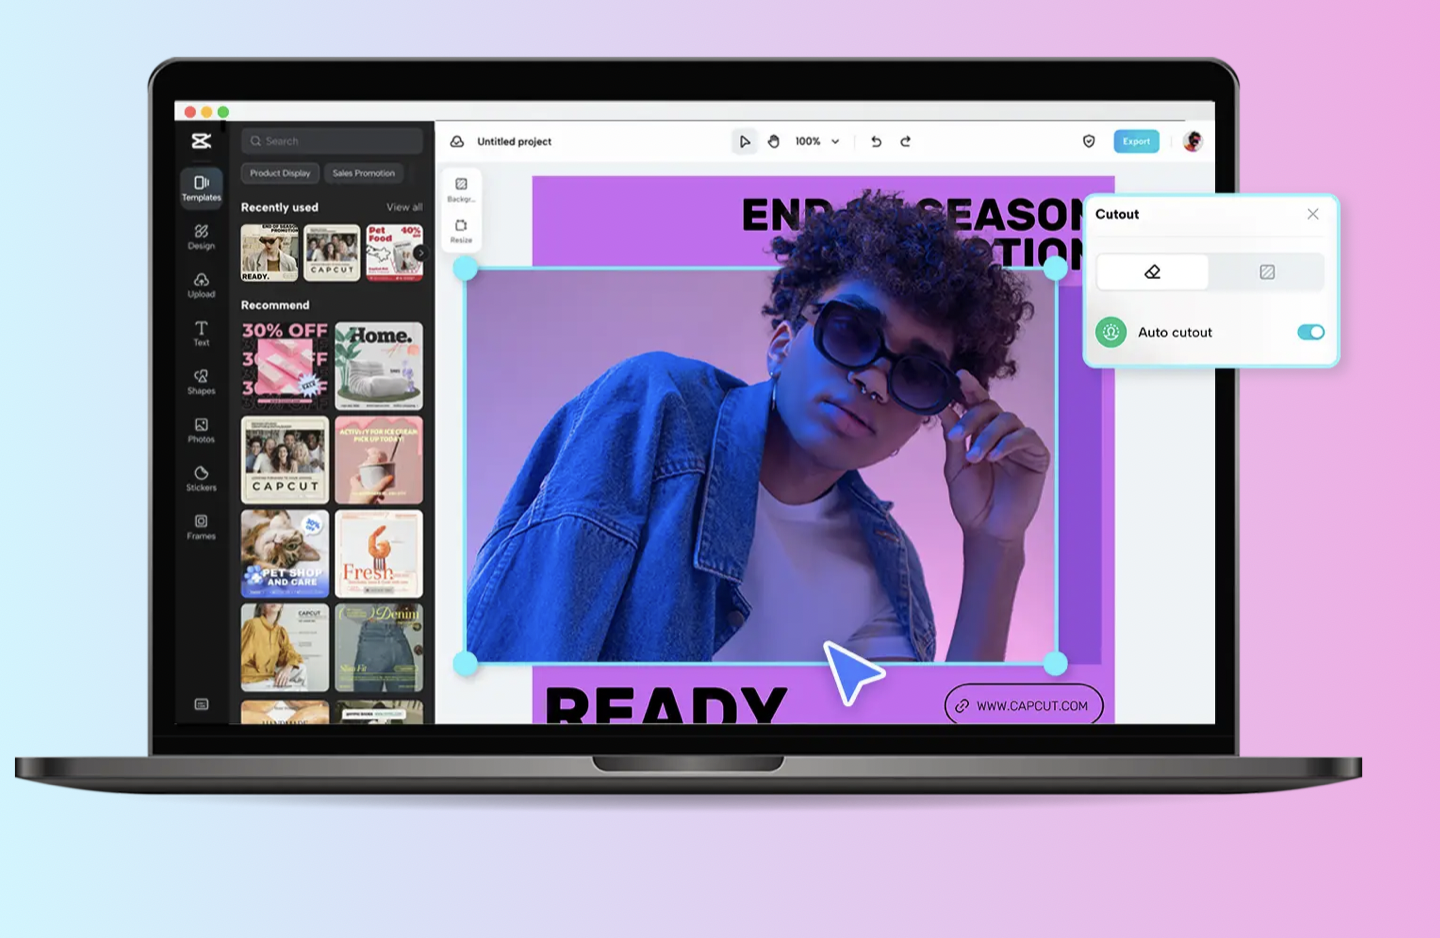
CapCut is a web-based and desktop photo editor that allows you to edit JPEG, PNG, JPG, and PDF files. In addition to the image compression, you can also use the tool for cropping, flipping, copy-pasting, and duplicating images. The platform also boasts smart AI tools, an array of filters, effects, colour themes, a layer rearranger, and a background remover. To compress JPEG images without quality loss using CapCut's online photo editor, follow these steps:
-
Upload the image you want to compress.
-
Edit it if needed.
-
Compress and Export
Click on "Export" and choose the final output file format as JPEG. Set the preferred image size as 0.5x (540x540p), 1x (1080x1080p), 1.5x (1620x1620p), 2x (2160x2160p), or 3x (3240x3240p), depending on your preferences. Select the final image quality as High (154KB - 308KB), Medium (103KB - 206KB), or Low (69KB - 137KB).
-
Click "Download," and CapCut will compress the JPEG without losing quality and save it to your device's local storage.
How to Compress JPEG Images on Windows Using the Windows Photos Application
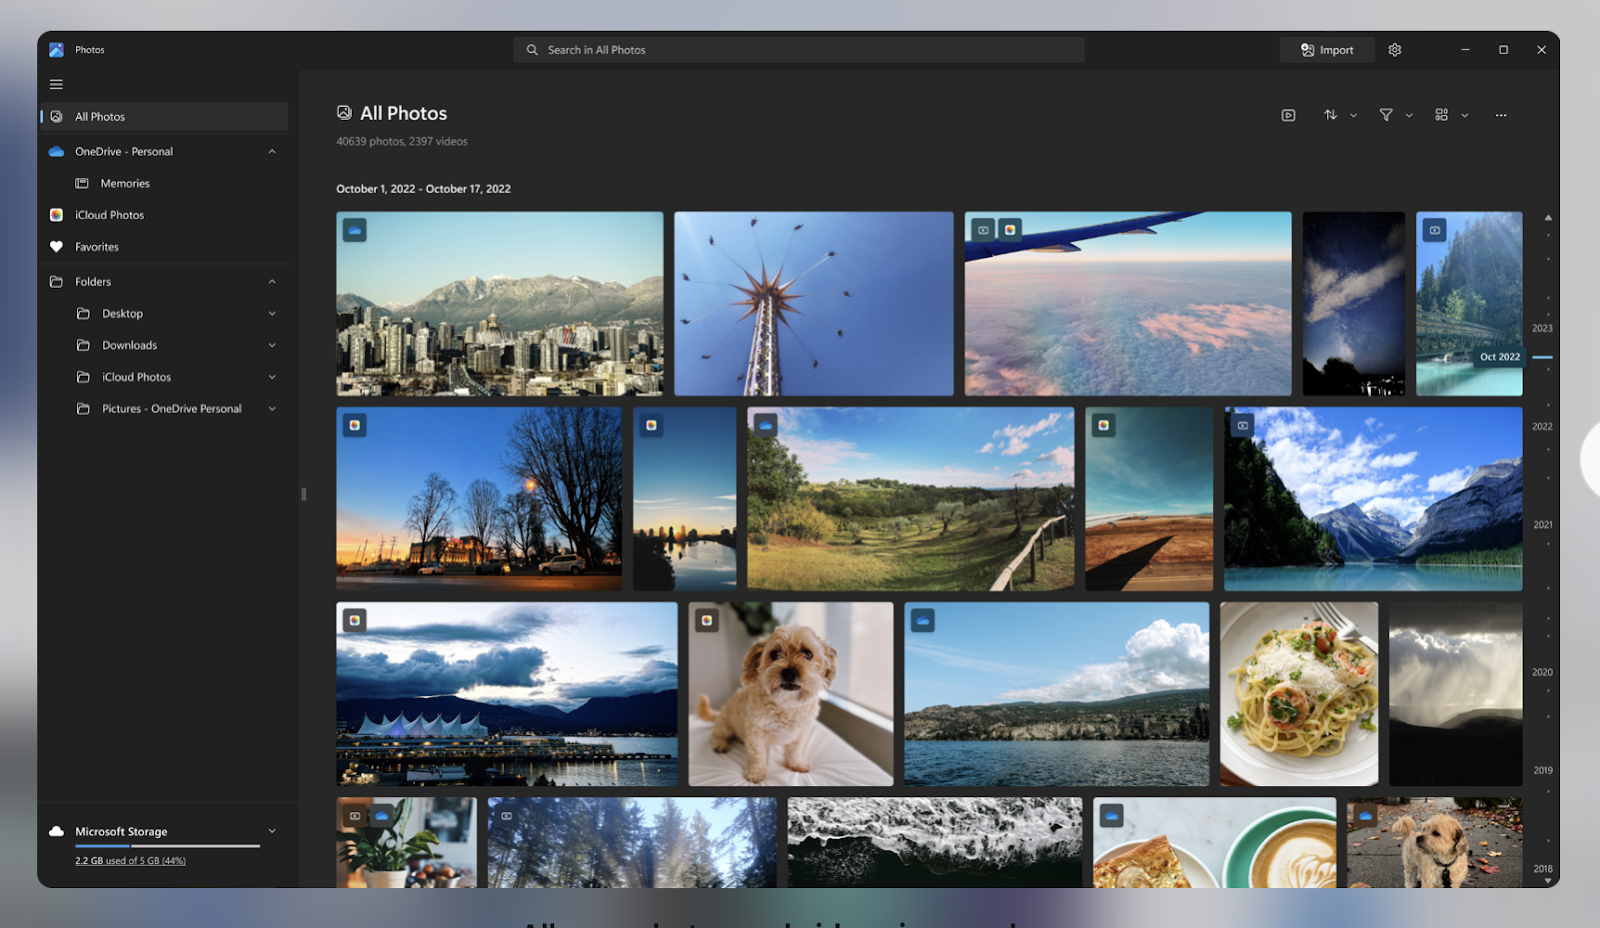
With the Windows Photos application, you can view, organise, and share your pictures. If you wish to compress JPEG images using this application, follow these steps:
-
Find the JPEG image you want to compress, right-click on it, and select "Open with."
-
Choose "Photos" to open the image in the Windows Photos app.
-
Once the image is open in the app, locate the three dots icon at the top of the screen.
-
Click on the icon and select the "Resize image" option.
-
Choose between pixels or percentages to set your desired image height and width.
-
Use the slider button to adjust the image quality according to your preference.
-
Select the JPG file type for the compressed image.
-
Click "Save" to store the compressed file.
How to Compress JPEG Images on Windows Using Paint
Who hasn't heard about Paint! If you haven’t, Paint is a versatile graphics editing tool, where you can create and edit images and drawings. With its simple and intuitive user interface, it's particularly well-suited for basic tasks like image cropping, drawing, resizing, and adding text or basic shapes. Here are three easy steps to compress JPEG images using Paint:
-
Right-click on the photo you want to compress.
-
Select "Open with" and choose "Paint."
-
Once the image is open in the Paint app, press Ctrl+W or click on the "Resize and skew" option in the Home tab.
-
Set your desired horizontal and vertical aspect ratio to reduce the image size in pixels or percentages.
-
Tick the "Maintain aspect ratio" box.
-
Click the "OK" button to close the popup window.
-
Go to File, click "Save as," and select "JPEG picture" to save your compressed JPEG image.
How to Compress JPEG Images on MacOS Using Mac Preview
Mac Preview, as macOS's default software for image files, including JPEG, JPG, PNG, and PDF, not only provides a simplified way to view various files but also offers photo editing and markup features.
To compress a JPEG image using Mac Preview, follow these steps:
-
Locate the JPEG image you want to compress and double-click it to open it in Mac Preview.
-
Navigate to the "Tools" menu in the menu bar.
-
Click on "Adjust Size."
-
In the "Image Dimensions" menu, explore the resizing options.
-
Use "Fit into" for predefined dimensions.
-
Utilise "Resolution" to adjust the resolution.
-
Opt for "Pixels" to specify dimensions in pixels.
-
Monitor the "Resulting Size" option to see the changed ratio and final image size.
-
Open the "File" menu.
-
Click on "Save As" and save the compressed JPEG image.
How to Compress JPEG Images on MacOS Using Mac Convert
The Mac Convert Image is a recent addition to pre-installed Quick Action features, designed for swift image file conversions. It enables users to perform batch conversions, alter file sizes, and decide whether to retain image metadata post-conversion. To compress a JPEG using Convert Image, follow these straightforward steps:
-
Find your JPEG image on your Mac.
-
Right-click on it and navigate to Quick Actions.
-
Select "Convert Image."
-
In the Convert Image options, pick "JPEG" from the three provided image formats.
-
Click the dropdown menu under "Image Size."
-
Choose the final size of the image as "Small," "Medium," or "Large."
-
Click "Convert to JPEG" and save the compressed image.
How to Compress JPEG Images Online
Online image compression tools provide a convenient alternative to photo apps and editors, allowing users to easily compress JPEG images with just a few clicks.
Shortpixel, an online image compressor tool, is a good choice for compressing images, including JPEG, without sacrificing quality. It also supports PNG and GIF files. Here’s how:
-
Go to Shortpixel's Image Compression tool.
-
Select "Lossless" as the image compression type.
-
Drag and drop or select the JPEG image into the compression area.
-
Once the compression is complete, you will see the compression percentage for each image.
-
Click on the "Download" button to save the compressed images to your device.
Compress JPEG Images on iPhone or Android
Compressing JPEG images to a smaller size becomes especially crucial on mobile devices due to limited internal memory. If you're using an iPhone, there are several methods to achieve this. Here's one method:
Compress a JPEG Image on iPhone via Email
When sending a JPEG image via email on iPhone, you'll be prompted to compress it. Follow these steps:
-
Start the Photos app from your home screen.
-
Select and open the JPEG image you wish to compress.
-
Tap the Share icon, typically represented by a box with an arrow pointing upward.
-
From the toolbox, select "Mail" to transition to the new mail screen.
-
Enter an accessible email address.
-
When prompted, choose between "Small" or "Medium" for the image size.
-
Tap the "Send" button to send the compressed JPEG image.
After sending the compressed JPEG image via email, follow these steps to download the smaller image to your iPhone:
-
Open the email application on your iPhone.
-
Locate the email containing the compressed JPEG image.
-
Download the attached image by tapping on it or selecting the download option.
-
Save the downloaded image to your iPhone's Photos app or any other desired location.
Tip: Solutions for Sending Large Photos via Email:
If you need to send large photos via email, consider the following solutions:
-
Cloud storage services: Upload large photos to cloud storage services like Google Drive, Dropbox, or iCloud, and share the download link in your email.
-
File compression: Compress multiple large photos into a ZIP file before attaching it to your email. This reduces the overall file size.
-
Resize images: Use an image editor or resizing tool to reduce the dimensions of large photos before attaching them to an email.
-
Use messaging apps: Share large photos through messaging apps like WhatsApp or Telegram, which often have higher file size limits compared to email.
Compress JPEG Images on iPhone with a Third-Party App
If you prefer using an app to compress JPEG images on your iPhone, follow these steps using the example of the Compress Photos app:
-
Install the JPEG compressor app from the App Store and launch it.
-
Tap the Plus icon to display the JPEG images on your device and select the desired photos.
-
Tap "Done" to enter the settings screen.
-
Adjust the "Image Quality" and "Image Dimensions" by moving the sliders according to your preferences.
-
Tap the "Compress Images" button to start the compression process.
-
After compression, decide whether to delete the original images by tapping "Delete Originals" or choose to keep them.
Compress JPEG Image Size on Android
If you're using an Android phone, you'll need a third-party app like Photo & Picture Resizer to compress JPEG images. Here's a guide to using this app.
-
Install the JPEG compressor app, such as Photo & Picture Resizer, from the Play Store.
-
Run the app once it's installed.
-
Tap "Select Photos" on the main page.
-
Choose the JPEG images you want to compress, and the app will display the original size and resolution.
-
Select the "Resize" tool at the upper right corner.
-
Reset the Width and Height as per your requirements.
-
Tap "OK" to confirm the changes.
-
Optionally, use the Crop tool to adjust the image further.
-
View the compressed image in the "Resized photos" album.
FAQs
How do I reduce the file size of a JPEG photo?
To reduce the file size of a JPEG photo, you can use image editing tools or online compressors. Resize the image dimensions, adjust the image quality or compression settings, and save it in a compressed format. This can be done with various software or online platforms.
How do I compress a JPEG image size?
You can compress a JPEG image size using various methods. One common way is to use online image compressors or photo editing software. Open the image, adjust the dimensions or quality settings, and save the compressed version.
How do I compress a JPEG but keep quality?
To compress a JPEG while maintaining quality, use a tool that offers lossless compression or allows you to control the compression settings. Choose a moderate compression level to reduce file size without significant quality loss. Online tools like CapCut or specialised image compression software like 4K Image Compressor often provide options for quality-preserving compression.
How do I compress a high-quality image?
Compressing a high-quality image can be done using image editing software or online tools. Choose a tool that allows you to adjust compression settings while maintaining high quality. Reduce dimensions, adjust quality settings, or use advanced options for optimal results.
How do I make a JPEG smaller without cropping it?
Making a JPEG smaller without cropping involves resizing the image dimensions or adjusting compression settings. Use an image editing tool or online compressor to open the image, adjust the size or quality settings, and save the smaller version without cropping any part of the image.
 SHARE ON TWITTER


Thanks for feedback
Your comments will appear here shortly. Please spread the word about us in social networks.