

The best camera is the one that you have with you, as the famous saying goes. Carrying a DSLR around with you at all times is not exactly handy, but you can take advantage of a pocket-sized device that is always with you, an iPhone. It already provides high quality images and a variety of different filters and modes for enhancement, but you can really take your iPhone photography to the next level if you learn some essential techniques. Don’t worry, no extensive photography class is required, all you need is already in this article. Prepare to seriously improve your iPhonography skills. Ready, set... tap!
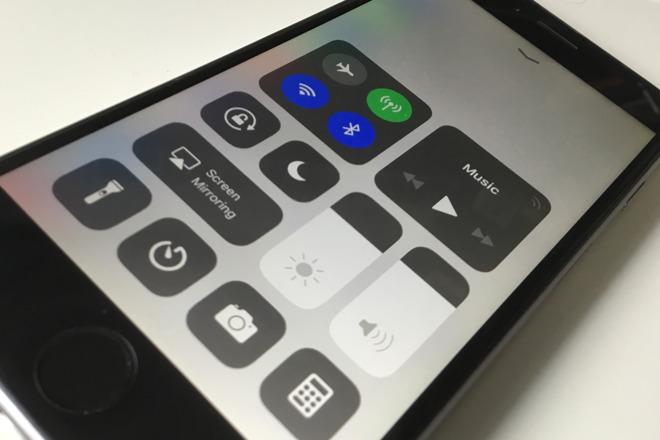
Get Fast Access to Your Camera
Sometimes you need to quickly capture the moment to get that unique shot. What can easily ruin it, is wasting time unlocking, swiping screens looking for Camera, then waiting for it to open. When every second counts, you have to find a way to skip through all time-consuming processes. And there is a way!
Simply swipe from right to left across the Lock Screen until the Camera application appears.
Alternatively, you can press the Home button, then swipe up from the bottom of the screen to open the Camera app.
Consider the Importance of Good Lighting
The time of the day and how well the place and subject is lit, means everything when you rely only on camera for successful photography and don’t use any lightning supplies. Midday and evening after the sun goes down are the least suitable times for iPhone photographers. Instead, it’s better to shoot in well-lit locations in the mornings and evenings.
In photography, there is the golden hour, a term for a specific period of time that is about an hour after sunrise and an hour before sunset. During the golden hour, daylight is softer than when the sun is higher in the sky. It makes for one the easiest periods to shoot, but it can still go awry if you don’t consider the sun’s positions. For portraits, compose your shot so that the sun is to the side, resulting in one side of your subject being shadowed which adds texture and depth to the portrait. If you aren’t shooting a portrait, make sure the sun’s position is in front of your subject. Back-lighting is also one of the best and most popular uses of the golden hour — bring the magical glow to your photo by placing the sun behind a subject.

Reduce Grain by Adjusting Exposure
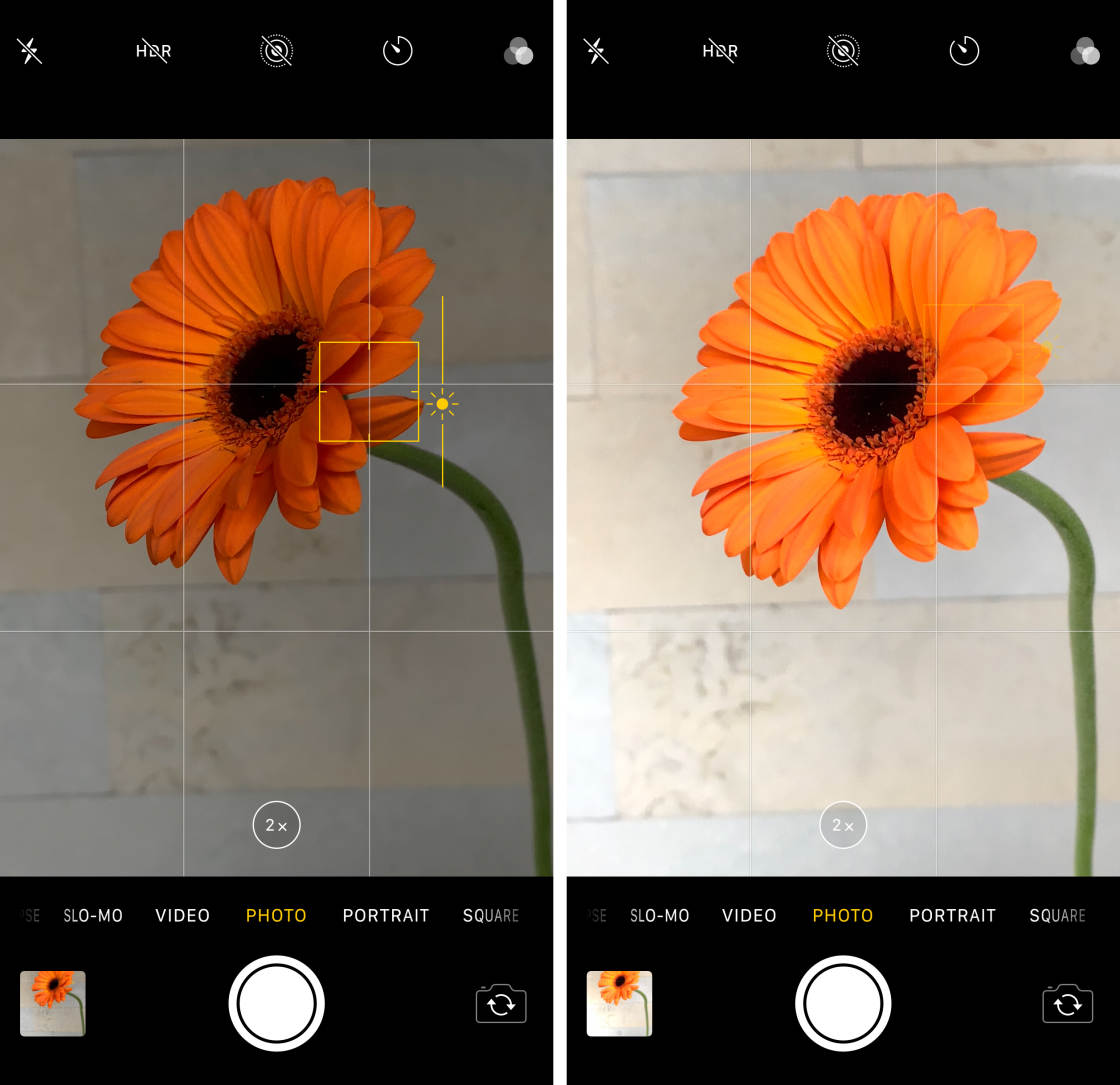
Low lighting takes a lot away from the quality of your photos, which is why they look grainy when you shoot at night or in poorly lit locations. What you can do to create sharper shots, is manually adjust the exposure levels.
Tap to focus, and then slide down on the viewfinder. Your goal is to reduce the exposure to make all shadows look darker, therefore lowering the amount of visible grains. Move along the exposure slider with your swipes and adjust the exposure until you are satisfied with the result.
Improve Composition Using the Camera Grid
The art of balanced composition can be mastered by applying the good old rule of thirds, commonly practiced in design, film, painting, and of course, photography. According to the rule each picture should be divided into 9 equal parts by 2 vertical and 2 horizontal lines. The subject matter of the photo should be placed at the intersections of those lines or along them.
It’s easier to practice the rule when you don’t have to imagine the sections yourself, but see the grid lined out on your screen. In order to enable the grid display, go to Settings > Photos & Camera > Grid.

Get Closer Instead of Using Digital Zoom
iPhone doesn’t have an actual optical zoom, and what it does when you zoom in on your screen, is cropping the image and blowing it up. This is why your photos look pixelated and grainy as a result.
Instead of reducing the quality of your images by shooting from afar, get
in closer to capture your objects. The iPhone’s camera has a f/2.2
aperture
that allows for creating DSLR-like shots up close, with noticeable
separation between the object and the foreground. Take advantage of it!

Shoot Moving Objects in Burst Mode
Some of the most expressive and magnetic photos are the ones of objects in motion. However, they are notoriously difficult to catch, especially when you are using a smartphone camera. Luckily, the iPhone's Burst Mode is here to save the day and help you get a bunch of breathtaking action shots with no additional effort. With this mode enabled, your iPhone takes 10 photos per second, from which you can choose the best and delete the rest. In can be particularly useful when taking photos of children, shooting sports and music events, and other activities.
In order to turn Burst Mode on, simply hold your finger on the shutter
button in the Camera application, then release when you’ve finished
shooting.
Utilize HDR Mode for More Dynamic Photographs
Our vision grants us the ability to see highly contrasted scenes and perceive them in their full luminosity, whereas cameras don’t have such a capability. What helps the iPhone camera to register the high dynamic ranges of any scenery, is the HDR mode. HDR mixes together several different exposures to create a single picture with life-like rich colors and tones.
You can enable Auto HDR to let your iPhone decide when it’s best to be on
(and it’s actually pretty good at noticing tricky lighting conditions).
It’s recommended to also save original shots along with HDR ones as the
latter tend to sometimes turn out a bit flat-looking. But when you have all
versions of a photo on hands, you have more options to pick the best from.
Open Settings > Camera, then scroll down until you see the HDR section.
Find the Auto HDR and Keep Normal Photo options and turn them on.
If you want to backup your photos from Instagram or download images by hashtag , location and from accounts of your favorite photographers, use 4K Stogram . It gets images in original quality and resolution to your computer, supports the downloading of Instagram Stories , Highlights , Carousel and Saved posts .
 SHARE ON TWITTER


Thanks for feedback
Your comments will appear here shortly. Please spread the word about us in social networks.